How to Change Voicemail on iPhone and Ditch the Robotic Greeting!
Tired of the robotic voice informing callers they’ve reached your iPhone voicemail? You’re not alone! The default greeting might be functional, but it lacks personality. Luckily, personalizing your voicemail greeting on iPhone is a breeze! In this quick guide, we’ll explore two simple methods: using the Phone app for a quick and easy solution, or venturing into Settings for a more carrier-agnostic approach. By the end, you’ll be a voicemail greeting pro, ready to record a clear, informative message that leaves a positive first impression on those who call you. Let’s dive in and see which method works best for you!

There are two ways to change your voicemail greeting on an iPhone, so let’s dive in and see which method works best for you!
Method 1: Using the Phone App
This method works for most carriers but might have slight variations depending on your specific carrier. Here’s how to do it:
1. Open the Phone App:
Tap the Phone app icon on your home screen. This will open the phone dialer where you can make and receive calls.
2. Go to Voicemail:
At the bottom navigation bar of the Phone app, tap the “Voicemail” tab. This will show you your voicemail messages and settings.
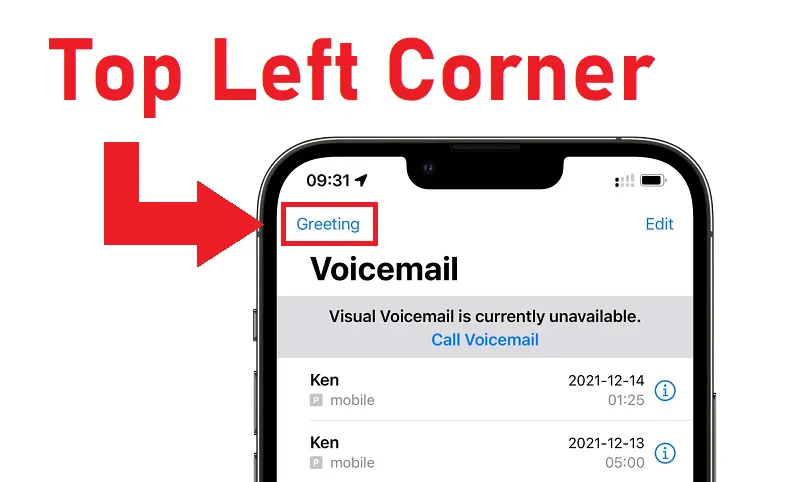
3. Access Greeting Option (if available):
- Look for the “Greeting” option in the top left corner. If you see it, tap on it.
- This option allows you to directly change your greeting within the Phone app.
If you don’t see the “Greeting” option, proceed to Method 2 which uses Settings.*
4. Choose Custom Greeting (if available):
Once you tap “Greeting”, you might see options for “Default” and “Custom”.
Tap “Custom” if you want to record your own personalized greeting.

5. Record Your New Greeting:
Tap the “Record” button to begin recording your new voicemail greeting.
Speak clearly and concisely into your phone’s microphone to record your message.
Briefly explain to callers who they’ve reached and what they should do to leave a message.
6. Listen and Save (if available):
After recording, you might have the option to listen to your greeting before saving it.
Tap “Play” to listen to your recording.
If you’re happy with it, tap “Save” to confirm your new voicemail greeting.
Method 2: Using Settings (if Greeting option unavailable in Phone app)
This method works for all carriers but involves calling your voicemail and using keypad prompts.
1. Open Settings App:
Tap the Settings app icon on your home screen. This will open your iPhone’s settings menu.
2. Go to Phone Settings:
Tap on “Phone” within the Settings menu. This will open your iPhone’s phone settings.
3. Change Voicemail Password (Optional):
- Tap on “Change Voicemail Password”. This allows you to set or change your voicemail password for accessing voicemail settings remotely.
(Note: This step is optional and doesn’t directly change your greeting)
4. Call Your Voicemail:
Exit the Settings app and return to the Phone app.
Dial your own phone number or a number provided by your carrier to access your voicemail.
You’ll be connected to your voicemail system.
5. Follow Voicemail Prompts:
Listen to the automated instructions provided by your voicemail system.
Typically, you’ll need to press a specific number on your keypad to access greeting options.
6. Choose “Custom Greeting” (using keypad):
Once you hear the options, press the number corresponding to “Change Greeting” or “Record Greeting”.
This will allow you to record a new custom greeting.
7. Record Your New Greeting (using keypad):
Follow the instructions provided by the voicemail system to record your new greeting.
Speak clearly and record your message using your phone’s keypad prompts.
8. Save Your Greeting (using keypad):
After recording, the voicemail system might prompt you to confirm or save your recording.
Press the designated number to save your new voicemail greeting.
Remember: Specific steps and keypad prompts might vary depending on your carrier. If you’re unsure, consult your carrier’s website or contact them for more specific instructions.